This can be a problem if you are using the default settings in Microsoft Outlook, as it will delete those meeting requests by default after you have responded to them. Luckily there is a setting that you can change which will let you keep them in the inbox so that you can find and reference them later.
How to Preserve Meeting Requests in Outlook 2010
Our guide continues below with additional information on how to keep meeting requests in your inbox in Outlook, including pictures of these steps. One of the best aspects of using Microsoft Outlook is the features that it offers when you communicate with other Outlook users. Whether you want to send an email to a list of contacts, or get a read receipt, there are a lot of options. Among these features is the ability to send a meeting request to someone else. If the recipient accepts the request, then it will be added to your Outlook calendar. However, the default behavior in Outlook 2010 will then delete the meeting request from your Inbox. While this might be fine in some situations, it can be problematic if you need information on that request, such as an address or a conference call number. So continue reading below to learn how to change your settings so that you don’t delete meeting requests from your Inbox in Outlook 2010.
How to Keep Meeting Requests in Outlook 2010 Inbox (Guide with Pictures)
This default behavior in Outlook 2010 can actually make you think you might be going crazy. I accepted a meeting request with a phone number on it, assuming that I would be able to open that message again in the future to get the number. But when I went back to my Inbox right before the meeting, the message was gone. I was ultimately able to find the message in my Deleted Items folder, which is not preferable if you have configured Outlook to empty your Deleted Items folder upon exit.
Step 1: Launch Microsoft Outlook 2010.
Step 2: Click the File tab at the top-left corner of the window.
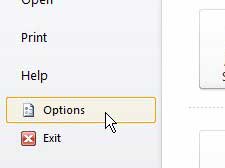
Step 3: Click Options at the bottom of the left column.
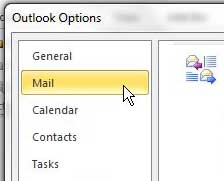
Step 4: Click Mail in the column at the left side of the Outlook Options window.
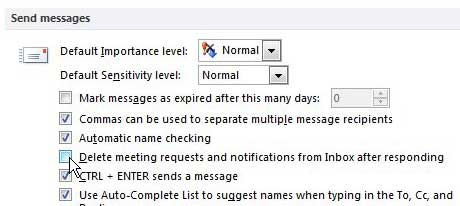
Step 5: Scroll to the Send Messages section at the center of the window.
Step 6: Click the box to the left of Delete meeting requests and notifications from Inbox after responding.
Step 7: Click the OK button at the bottom of the window.
Now that you know how to keep meeting requests in your Outlook inbox you will be able to find and reference them much more easily in the future. if you find that it’s clogging up your inbox by keeping your meeting requests in the inbox then you can always come back here in the future and turn this setting back off.
Additional Sources
After receiving his Bachelor’s and Master’s degrees in Computer Science he spent several years working in IT management for small businesses. However, he now works full time writing content online and creating websites. His main writing topics include iPhones, Microsoft Office, Google Apps, Android, and Photoshop, but he has also written about many other tech topics as well. Read his full bio here.
You may opt out at any time. Read our Privacy Policy


