But your spreadsheet needs may not be met by the automatic resizing, and you might need to learn how to manually change your row height in Google Sheets. The default row height in Google Sheets is ideal for data that is in the default font size, and only takes up one row in the cell. But if you have found that the current row size is either too big or too small, then you might decide that you need to adjust the size of the row to make it look better. Fortunately you can change the row height in Google Sheets to make it accommodate your data needs. Our tutorial below will show you how to select a row and enter a new row height value for it.
How to Increase or Decrease Row Height in Google Sheets
Our article continues below with additional information and pictures for each of these steps.
How to Make a Row Bigger or Smaller in Google Sheets (Guide with Pictures)
The steps in this article were performed in the desktop version of Google Chrome, but will also work in other desktop Web browsers as well. Once you have completed this guide you will have adjusted the height of a row in your Google Sheets spreadsheet to a new size that you specify.
Step 1: Sign into your Google Drive account and open the Sheets file containing the row that you wish to resize.
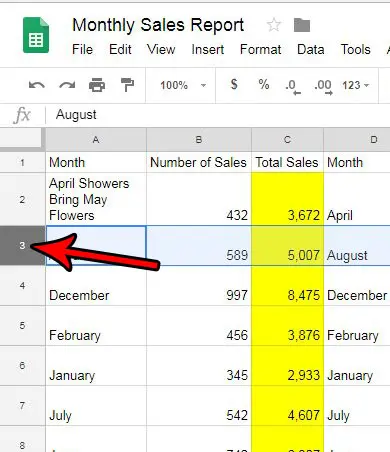
Step 2: Click the row number of the row that you wish to make bigger or smaller.
The row number is the gray rectangle at the left side of the spreadsheet. You can select multiple row numbers at once by holding down the Ctrl key on your keyboard and clicking each row number that you want to resize.
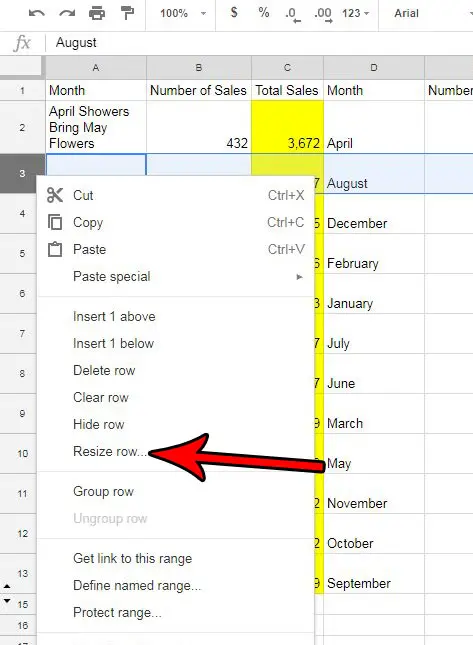
Step 3: Right-click the selected row number, then choose the Resize row option.
If you have selected multiple rows, then this option will say Resize selected rows instead.
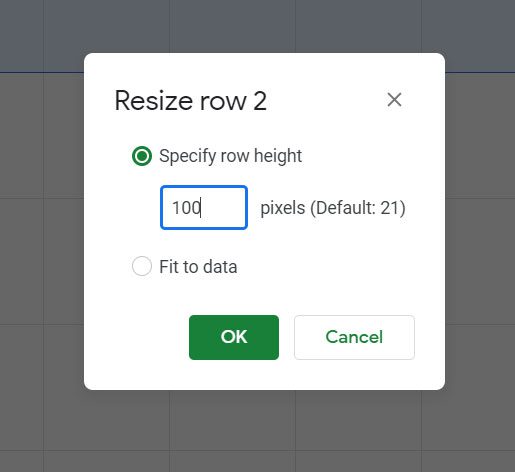
Step 4: Select the Specify row height option, delete the current value, then enter the new row height. Once you are done, click the OK button.
Note that the default row height is 21 so, for example, if you wanted to make the row twice as tall as it is now, you would enter 42. You can use a similar method if you want to change the column width in your spreadsheet instead. It can take some trial and error before you are able to get the desired row height or column width correct. The “pixel” value is tough to work with. However, I have found it to be helpful to use percentages of the current point value to get my sizing right. For example, if the current row height is 21 and I want it to be twice as large, then I would set it to 42. This is helpful for creating a baseline that will eventually get the row height correct. Does your Google Sheets spreadsheet have a lot of rows that you don’t need, but you want to delete them more quickly than one at a time? Find out how to delete multiple rows at once in Google Sheets and quickly get rid of all of your unwanted rows.
See also
How to merge cells in Google SheetsHow to wrap text in Google SheetsHow to alphabetize in Google SheetsHow to subtract in Google Sheets
After receiving his Bachelor’s and Master’s degrees in Computer Science he spent several years working in IT management for small businesses. However, he now works full time writing content online and creating websites. His main writing topics include iPhones, Microsoft Office, Google Apps, Android, and Photoshop, but he has also written about many other tech topics as well. Read his full bio here.
You may opt out at any time. Read our Privacy Policy