But if you have already entered an entire row of data into your worksheet, the prospect of deleting and retyping it, or manually cutting and pasting individual cells, can seem tedious. As you familiarize yourself with the Microsoft Excel interface you will discover that you are able to edit and manipulate both the data that appears inside of your cells, as well as the rows, columns, and cell structure that forms the layout of your spreadsheet’s data. One way to expedite the process of moving data is to move entire rows at a time. This is accomplished in Excel 2010 by cutting a row from its current location and pasting it into the desired new location.
How to Move Entire Row in Excel 2010
Our tutorial continues below with additional information on moving a row in Excel 2010, including pictures of these steps. Want to keep one of your rows visible at the top of the sheet? Our how to lock a row in Excel tutorial can show you which setting you need to use.
How Do You Move a Row in Excel? (Guide with Pictures)
The steps that are required to move a row in Microsoft Excel 2010 are very similar to the steps required to move a column. You can read here to learn how to move columns in Excel as well. But you can continue below to move a row in Excel and see how the functionality works, which can give you a clearer understanding of how rows and columns interact within the context of your entire Excel spreadsheet.
Step 1: Open the spreadsheet containing the row that you want to move.
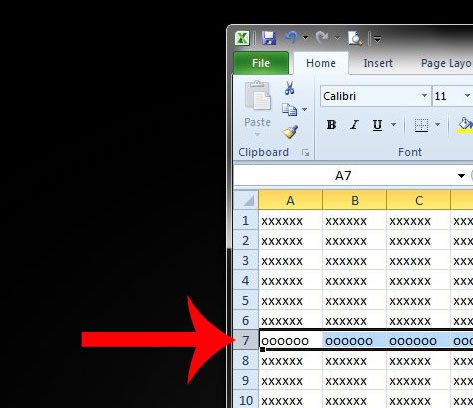
Step 2: Locate the row number of the row that you want to move, then click the row number once to select the entire row.
Note that you can select a range of multiple rows by clicking the top row that you wish to move, then holding the Shift key on your keyboard and clicking the bottom row that you wish to move.
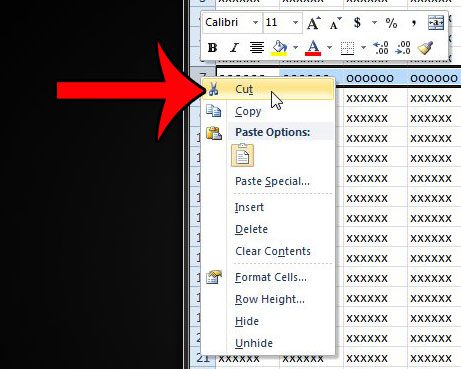
Step 3: Right-click the row number, then click the Cut option.
Note that you can also cut the selected row by pressing Ctrl + X on your keyboard, or by clicking the Cut icon in the Clipboard section of the Home tab.
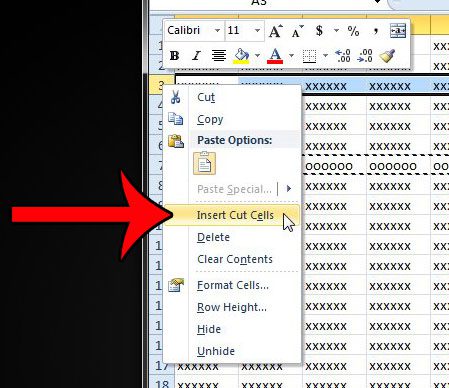
Step 4: Click the row number under which you would like to insert the row that you just cut.
For example, I am selecting row 3 in the image below. This means that the row I cut in the previous step will be inserted above row 3, pushing the current row 3 down to row 4.
Step 5: Right-click the row number that you selected in Step 4, then click the Insert Cut Cells option.
Our guide continues below with additional discussion on moving rows in Excel.
More Information on How to Move a Row in Excel 2010
While the steps outlined above were performed in Microsoft Excel 2010, they will also work in other versions of Microsoft’s spreadsheet application, such as Excel 2013, Excel 2016, and Excel for office 365 As mentioned earlier, you can move rows in Excel by clicking the first row that you wish to move, holding the Shift key on your keyboard, then clicking the bottom row that you want to move. Note that you need to keep the Shift key pressed till the entire group of selected cells is part of your selection. This method for moving multiple rows in Excel will only work for a contiguous group of rows. You will not be able to select different individual rows from all over your spreadsheet. Another way that you can select multiple lines or columns is to hold down the Ctrl key on your keyboard then click each of the cell ranges that you would like to move. If you are trying to move an entire column then you can follow the same technique of clicking on the column heading with your left mouse button to select the entire range of cells in the selected column, then right-click on the selection. This brings up a similar context menu to what we saw when we were trying to insert rows in a different location. You can then cut the column, then choose the destination cells for that selection and select “Insert Cut Cells” from the right-click menu. If you want to insert a new row or a new column then you can select the row above where you want the new row, or the column to the right of where you want the new column, then right click on the selection and choose the Insert option. Is there a row of information in your spreadsheet that you do not need, or that you do not want other people to see? Learn how to hide a row in Excel 2010 to keep the data in your spreadsheet, but stop it from being visible.
Additional Sources
After receiving his Bachelor’s and Master’s degrees in Computer Science he spent several years working in IT management for small businesses. However, he now works full time writing content online and creating websites. His main writing topics include iPhones, Microsoft Office, Google Apps, Android, and Photoshop, but he has also written about many other tech topics as well. Read his full bio here.
You may opt out at any time. Read our Privacy Policy