But these tools can feel like an unnecessary added stop when you want to do something that seems like it should be easy. One such edit involves placing text on a picture. Our tutorial below will show you how to put a picture behind text in a Word document.
How to Put an Image Behind Text in a Word Document
Our guide continues below with more information on putting a picture behind text in Word, including pictures of these steps. Are you trying to write in small capital letters? Our apply small caps effect in Word article can show you where to find that option. Some of the more creative and less-rigidly formatted documents that you will create in Microsoft Word could involve the combination of various types of media and document objects. For example, you may need to know how to put a picture behind text when your document image needs some editing and you don’t want to use something like Photoshop or Microsoft Paint. You can customize most of the elements of your Microsoft Word 2010 documents, including the background of the document. Many people assume that they can only add text and images to their document as the actual body of that document, but you can also configure the background of the document. For instance, you can put an image behind text in Microsoft Word 2010 to set it as the background for whatever you are writing. You can configure some of the settings for the image that is behind your text, allowing you to make it more transparent so that the top-level text is still able to be read. Continue reading to learn more about putting an image behind text in Word 2010. If you also use Google Apps, then you may want to check our guide on how to put a picture on Google so that you can use it in those apps as well.
How to Insert a Background Image in Word 2010 (Guide with Pictures)
Whatever your reasoning might be for wanting to put an image behind your document text in Word 2010, it can create an interesting effect for the document. Whether you are using this background image like a watermark or because you think it improves the visual appearance of the document, the process for putting the image behind your text can be followed below.
Step 1: Open the Word 2010 document in which you want to insert the image behind your text.
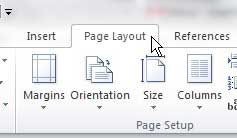
Step 2: Click the Page Layout tab at the top of the window.
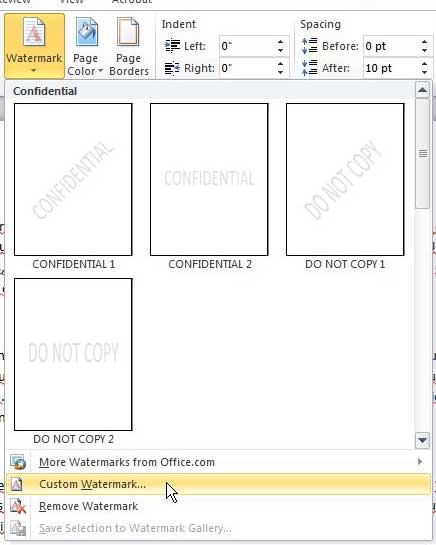
Step 3: Click the Watermark drop-down menu in the Page Background section of the ribbon at the top of the window, then click the Custom Watermark option.
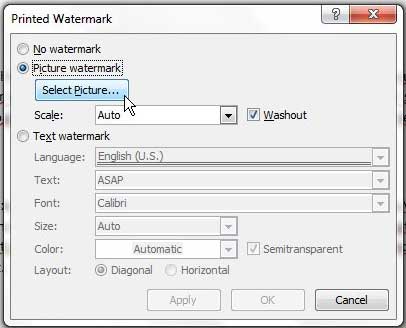
Step 4: Select the Picture Watermark option at the top of the window, then click the Select Picture button to choose the image that you want to put behind your text in Word 2010.
You will be able to select the image from your computer, so it’s easiest to already have the picture saved to a folder on your computer that you can find easily.
Step 5: Click the drop-down menu to the right of Scale, then choose the size that you want the background image to be.
Step 6: Check or uncheck the box to the left of Washout if you want to make the image more transparent, which will help to make your overlaying text easier to read.
Step 7: When you have finished configuring the options for the image behind your text in Word 2010, click the OK button at the bottom of the window. Note that you can click the Apply button at the bottom of the window at any time to see how your changes will look in the document.
Our guide continues below with more information on working with text and image layers in Microsoft Word, such as if you only want to include a picture behind text on one page in your document.
How Do I Adjust Text Wrapping on the Page Layout Tab in My Word Document?
Some non-traditional layout options in a document will involve learning how to wrap text. This option is found on the Layout tab, in the Arrange group of the ribbon. It is also one of the picture tools located on the Format Shape tab that appears when you select your picture. When you select the picture, Word displays the Wrap Text button, allowing you to click it. The options you will find on the dropdown menu include:
In line with textSquareTightThroughTop and BottomBehind TextIn front of text
You can also click the More Layout Options button at the bottom of the menu, which is going to open a Layout dialog box. This provides additional text wrapping options.
More Information on How to Put a Picture Behind Text in Word 2010
One other way that you can accomplish this task is to add a picture to your document, then place a text box on top of the picture. You will need to add the picture, then insert a text box from the Insert menu. You can then click on the border of the text box to select the entire object, then click the arrow to the right of Bring Forward and choose the Bring in Front of Text option. This will move the picture behind the text so that you can achieve the desired effect. The background color of a text box in Microsoft Word is going to have a white background by default. You can switch this to a different color, or remove it entirely, by clicking inside the text box, selecting the Shape Format tab at the top of the window, then clicking Shape Fill and choosing a color there. The No Fill option will remove the background entirely so that you can see the picture through the text box. In newer versions of Microsoft Word, the Watermark option is found on the Design tab, in the Page Background section of the ribbon. Any watermark that you add to your document is going to appear on each page of your document. If you only want to place an image behind text on one of your pages then you should utilize the picture and text box configuration that we mentioned earlier in this section.
After receiving his Bachelor’s and Master’s degrees in Computer Science he spent several years working in IT management for small businesses. However, he now works full time writing content online and creating websites. His main writing topics include iPhones, Microsoft Office, Google Apps, Android, and Photoshop, but he has also written about many other tech topics as well. Read his full bio here.
You may opt out at any time. Read our Privacy Policy


