Different teachers and professors often have their own preferred way for receiving documents. Microsoft Word 2013 makes this simple to accommodate by offering a wide range of options for customizing the appearance of your document. But sometimes you will need to implement something into your document where the method for doing so is not immediately clear. One area where this might happen is with page numbers. By default, Word 2013 will start numbering the first page of your document. But if your first page is a title page, you may prefer to have the page numbering start on the second page. Fortunately it is possible to set this up without affecting the page numbering mechanism.
How to Remove the Page Number from the First Page in Word 2013
Our article continues below with additional information on removing the page number from the first page in Word, including pictures for these steps. Check out our guide on deleting Microsoft Word section breaks if you are running into problems caused by sections and need to fix them.
Delete the Page Number from the First Page in Word (Guide with Pictures)
Working with items in the header in Word 2013, such as page numbers, can be a little tricky. They appear on every page, and are generated automatically. So it is not simply a matter of deleting a page number from a specific page – you need to adjust the entire page numbering mechanism. So continue reading below to learn how to remove the page number from the first page in Word 2013.
Step 1: Open the document for which you wish to remove the page number on the first page.
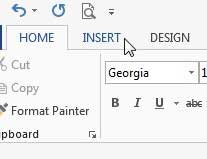
Step 2: Click the Insert tab at the top of the window.
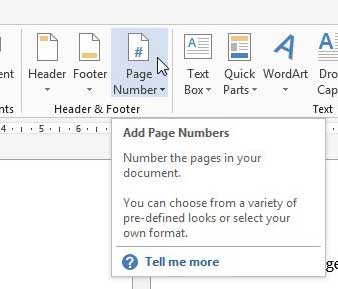
Step 3: Click the Page Number drop-down menu in the Header & Footer section of the ribbon.
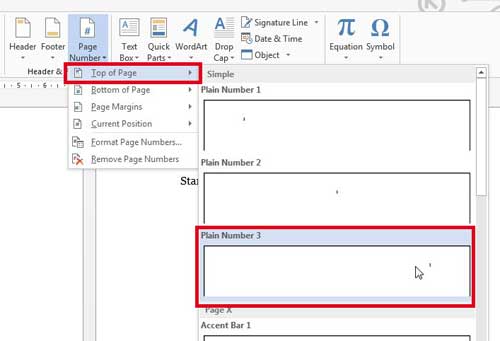
Step 4: Choose your preferred location for your page numbers, then select your preferred page number format.
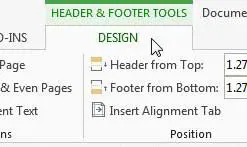
Step 5: Make sure that the Design tab under Header & Footer Tools is selected at the top of the window.
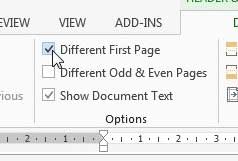
Step 6: Check the box to the left of Different First Page in the Options section of the window.
If you want your page numbering to start on the second page with “2”, then you can stop here. However, if you want to start with “1” on the second page, continue below.
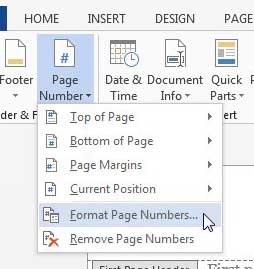
Step 7: Click the Page Number drop-down menu in the Header & Footer section of the window, then click Format Page Numbers.
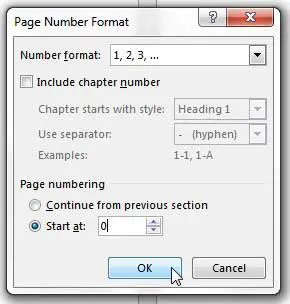
Step 8: Click the box to the left of Start at, then change the value to “0”.
Step 9: Click the OK button to apply your changes.
If you are using Microsoft Word 2010, you can follow the steps in this article to remove the page number in that program instead.
More on How to Start Page Numbers on Page 2 in Word 2016, Word 2019, or Word for Office 365
If your required page layout dictates that you include other information in the header, such as your last name or the document title, then simply click inside the header and type the information that you want to include on each page. If you need to remove page numbers from your document entirely, then you can click the Header & Footer tab, click the Page Numbers button, then select the Remove Page Numbers option from the bottom of the dropdown menu. Page numbering will always start on the first page in MS Word by default, as indicated by the fact that completing the steps above without changing the starting page number will start the numbering with “2.” If you have to reach a minimum page count and your page one or cover page isn’t supposed to be included in that count, then starting your number with “0” will give you a more accurate count of your document pages that actually count towards your total. You can change a number of other document options by opening the Page Setup menu found on the Layout tab (Page Layout tab in some earlier versions of Word.) You can click the small Page Setup dialog button found at the bottom-right corner of the Page Setup section in the ribbon. The dialog box that opens will include a handful of tabs at the top of the window, including Margins, Paper, and Layout. Many institutions have specific requirements for where page numbers should be located. When setting page numbers and specifying your first page number, pay attention to whether you need to have your page numbers and other header information at the top of the page or the bottom of the page. Your page count will adjust automatically when your content forces a new page or when you insert page breaks.
If you are having trouble with the layout of your document, then you might want to try enabling the option to show paragraph marks. You can find this by selecting the Home tab at the top of the window, then clicking the Show/Hide button in the Paragraph group on the ribbon. Once you have enabled these marks it will be a lot easier to remove blank lines or blank pages, as you just need to place your cursor after the unwanted mark, then press the Backspace key on your keyboard. If you are writing a lot of Word documents for work or school, then the last thing you want to do is worry about losing a document. That’s why it’s always a good idea to have backup copies that aren’t stored on your computer. Services like Dropbox are great for this, but you might also want to look into getting an external hard drive. It can serve as a backup drive for important documents, as well as a place to store media files that are taking up too much of your computer’s primary hard drive.
How to Delete Pages in Word
When you start making a lot of adjustments to the layout of your Word document on a PC or Mac computer, you can easily run into formatting issues due to things like custom margins, paragraph markers, or an extra blank page that makes its way into the document. One good way to eliminate these issues involves something we mentioned earlier, where you go to the Home tab, then click the Show/Hide button to display all of the document’s formatting marks. Once you are showing these marks, you can delete a blank page by simply finding the “Page Break” mark right before or after a blank page, then pressing the Backspace key on your keyboard to delete it. After receiving his Bachelor’s and Master’s degrees in Computer Science he spent several years working in IT management for small businesses. However, he now works full time writing content online and creating websites. His main writing topics include iPhones, Microsoft Office, Google Apps, Android, and Photoshop, but he has also written about many other tech topics as well. Read his full bio here.
You may opt out at any time. Read our Privacy Policy