While you can still perform most of the tasks in Excel that you need to when you are in a different view, you might want to switch back to the normal view because it is more comfortable. Fortunately it is easy to switch views in Excel 2013 by following the steps below.
Switching to Normal View in Excel 2013
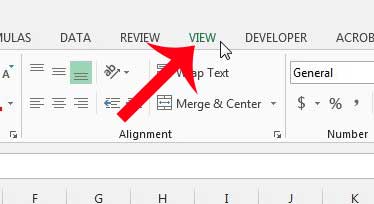
The Normal view in Excel 2013 is the one that the program opens to by default. This will display only the cells in your spreadsheet. You will not see the header and footer, nor will you see the page breaks. Step 1: Open the document in Excel 2013 that you want to return to Normal view. Step 2: Click the View tab at the top of the window.
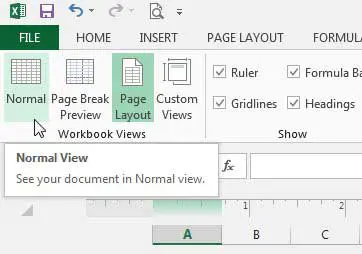
Step 3: Click the Normal option in the Workbook Views section of the navigational ribbon at the top of the window.
Be sure to save your workbook after switching views, as this is something that Excel saves when you close your workbook. If you do not save the spreadsheet it will continue to open with the view that was previously being used. Have you added comments to your spreadsheet that you want to be able to print with your spreadsheet? Learn how to print comments in Excel 2013. After receiving his Bachelor’s and Master’s degrees in Computer Science he spent several years working in IT management for small businesses. However, he now works full time writing content online and creating websites. His main writing topics include iPhones, Microsoft Office, Google Apps, Android, and Photoshop, but he has also written about many other tech topics as well. Read his full bio here.