Rotating Powerpoint 2010 Images
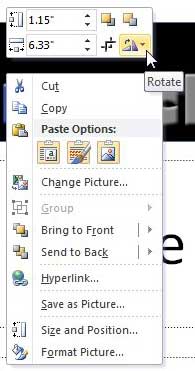
The basic rotation options that Powerpoint 2010 offers you will only rotate the image by 90 degrees at a time, in either direction. But you do have the opportunity to specify a rotation amount that is not a multiple of this 90 degree option. Therefore, you can follow the directions below to get your image to the position that you need for your presentation. Step 1: Open the presentation in Powerpoint 2010 that contains the image you want to rotate. Step 2: Click the slide that contains the image to be rotated. Step 3: Right-click the image, then click the Rotate drop-down menu.
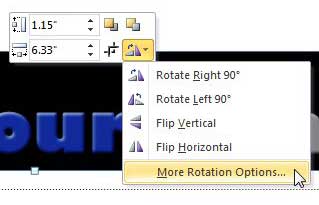
Step 4: Click the Rotate Right 90 or Rotate Left 90 option if you want to rotate the image by that amount, or click More Rotation Options if you want to specify a different amount of rotation.
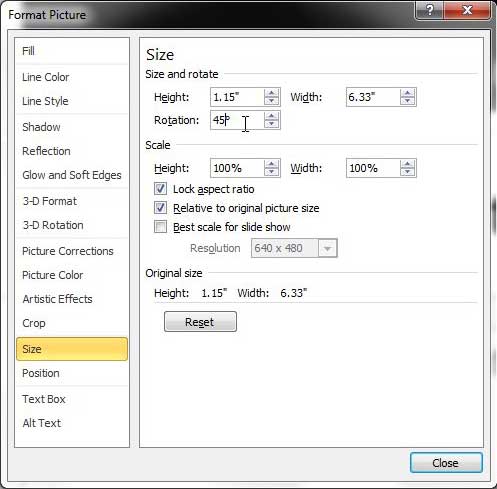
Step 5: Type an amount for the rotation into the Rotation field at the top of the window, then press the Enter key on your keyboard to apply that rotation amount to the image.
Note that the value in the Rotation field will always be relative to the original position of the image. For example, if you then returned to the Rotate drop-down menu and chose the Rotate Right 90 option, then that 90 degree rotation would be added or subtracted from the existing value in the Rotation field. After receiving his Bachelor’s and Master’s degrees in Computer Science he spent several years working in IT management for small businesses. However, he now works full time writing content online and creating websites. His main writing topics include iPhones, Microsoft Office, Google Apps, Android, and Photoshop, but he has also written about many other tech topics as well. Read his full bio here.
You may opt out at any time. Read our Privacy Policy