Luckily there is a way for you to learn how to set Excel column width in inches, which can make things much easier if you need specific physical dimensions for your data columns.
How to Do Cell Sizes in Inches in Excel 2013
Our guide continues below with additional information on how to set Excel column width in inches, including pictures of these steps. There are a couple different ways to change the size of a cell in Microsoft Excel, but the most common methods will require you to set your column width or row height using a unit of measure call that can be difficult to evaluate. Microsoft Word has similar tools for when you would like to switch between inches and centimeters for your margins. This unit of measure in Excel is for the the number of characters that will be displayed in the cell. This may not be very helpful, however, if you need to set specific cell sizes in your workbook. Fortunately you can make a quick adjustment that will allow you to set your cell sizes in inches instead of the default unit that is used in Excel’s Normal view. Our guide below will show you the steps to take so that Excel 2013 will let you enter values in inches instead of characters so that you can more easily set your cell sizes with a unit of measurement that is more familiar. Our autofit all columns Excel tutorial gives you a fast alternative to sizing columns when you just want them to be as wide as your data.
Setting Column Width and Row Height in Inches in Excel 2013 (Guide with Pictures)
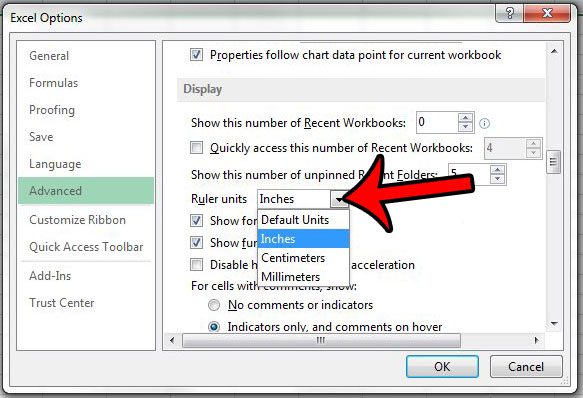
The steps in this article will assume that your Excel version is currently using the local unit of measurement that is preferred in your country. If not, then you can change the unit of measurement in Excel 2013 by clicking the File tab at the top-left of the window, clicking the Options button in the left column, Clicking the Advanced tab, then scrolling down and changing the Ruler Units setting in the Display section to your preferred unit of measurement. Once the unit of measurement is correct, then you can follow these steps below to learn how to set cell sizes in inches instead of the default “characters” setting that it uses otherwise.
Step 1: Open your workbook in Excel 2013.
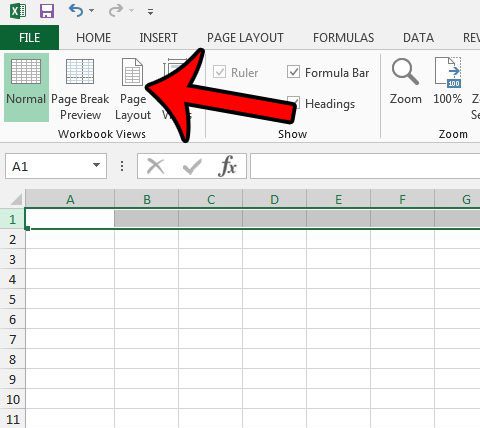
Step 2: Click the View tab at the top of the window.
Step 3: Click the Page Layout button in the Workbook Views section of the ribbon.
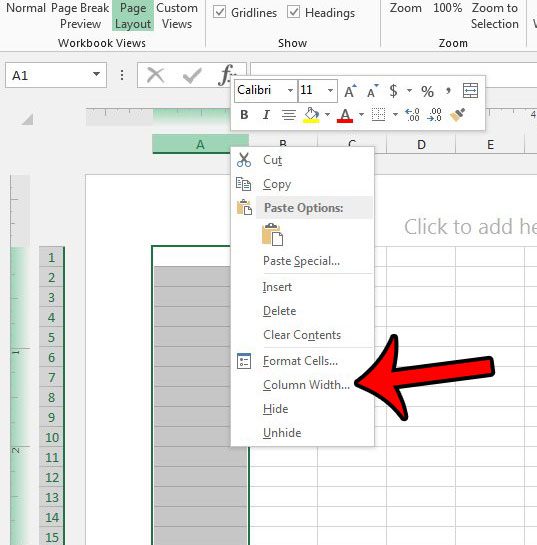
Step 4: Click the column letter or row number that you wish to set in inches, then click either Column Width or Row Height.
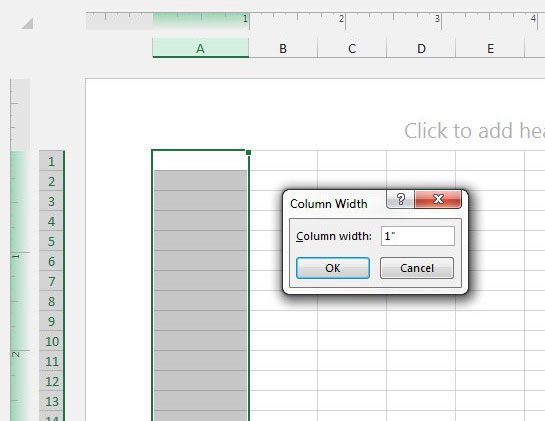
Step 5: Enter the inch value that you would like to use for the column width or row height, then click the OK button.
Now that you know how to make Excel column width in inches instead of their default option you will be able to more easily size your data for when you need to print it. If your Excel worksheet is not printing well, then you will probably need to change some settings. This article – https://www.solveyourtech.com/three-ways-to-fit-to-one-page-in-excel-2013/ – will show you three different ways that you can quickly adjust your worksheet to print the entire document on one page.
Additional Sources
After receiving his Bachelor’s and Master’s degrees in Computer Science he spent several years working in IT management for small businesses. However, he now works full time writing content online and creating websites. His main writing topics include iPhones, Microsoft Office, Google Apps, Android, and Photoshop, but he has also written about many other tech topics as well. Read his full bio here.