It might be something funny or interesting, or you might want to ask someone to help you fix something. Regardless of the reason, being able to take a picture of your device screen is something that is useful on any device that supports that function. Our how to screenshot on Acer laptop tutorial below will show you a simple way to accomplish this on your Windows computer.
Why Would I Want to Screenshot on My Acer Laptop?
I make screenshots a lot on my computer and smartphone because I use those images in the tutorials that I write. But even if your job isn’t something that would require you to be taking pictures of your screen, it’s still something that can be helpful in a lot of situations. Maybe you are having a problem with something on your computer and you want to be able to show someone an error message or a pop-up window so that they can see the problem you are experiencing. Or perhaps you have placed an order for something important and you want to save the order number in case you need to follow up on that order in the future. There is a lot of important information on your computer that you might need to share and aren’t able to save or download. Screenshots are perfect for those situations because it allows you to save the information and show others the things on your screen that may not be there later.
How to Take a Picture of Your Entire Screen in Windows 10
Our guide continues below with additional information on how to create screen captures in Windows 10 and automatically save them to your Pictures folder in image formats like .jpeg which work well in most other applications. When learning how to screen shot on Windows10 you will be able to generate pictures of just about anything you see on your screen. You aren’t restricted to just taking a screenshot of desktop Windows 10 configurations; you could capture something in a game, in Microsoft Word, or on a website. Once you become comfortable with printing screen on Windows it will become almost second nature and will be something that comes up in a surprising amount of situations. It’s often necessary for you to share information about things that you might be doing on your Acer laptop computer. There are a number of different ways you might have considered approaching this problem, but a screen shot laptop image can be as useful as any of them. This sharing can occur via email, online file sharing, but it can also take the form of showing someone what you see on your screen. It’s possible that, in the past, you may have tried to describe what you were seeing or doing. Or maybe you even pulled out your phone and decided to take a screenshot using the camera on that device. But you are able to create a screen capture in Windows 10 using various combinations of the Windows key, Print Screen, and some other keyboard shortcut methods that can allow you to capture what you need. If you need to take a screenshot on Windows 10 you can do so by pressing the Windows key + Print Screen keyboard shortcut. This is going to create a full screen screenshot that will be saved to a Screenshots folder in the Pictures folder. Once you become comfortable with this Win10 screenshot shortcut method you can find that it’s is very fast and useful. Our article below is going to show you how to use the Print Screen button and other various tools to create an image on your computer screen that can then be shared added to documents, edited in an image editor, and much more.
How to Use the Print Screen Key for a Windows 10 Screenshot (Guide with Pictures)
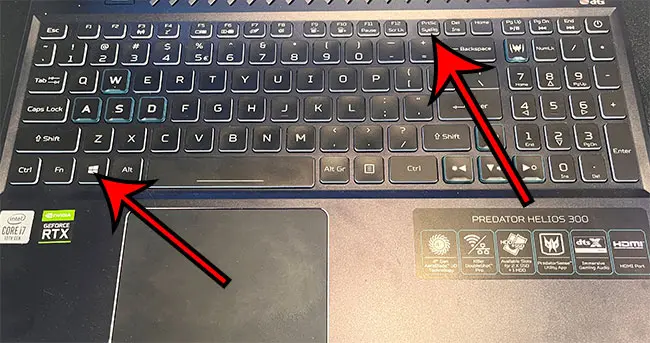
The steps in this article were performed on a Windows 10 Acer Predator Helios laptop but will work on many other versions of Windows, such as Windows 7, Windows Vista, and more.
Step 1: Adjust the current windows on your computer screen so that you can see the items you want to include in the screenshot.
Step 2: Press the Windows key and the Print Screen key at the same time to create the screenshot.
Now that you know how to take a Win 10 screenshot you will be able to create images of your computer screen that you can easily share with others, or open in an image editing application and make changes to. The Windows key is usually at the bottom-left corner of the keyboard on most keyboard layouts and has a Windows logo on it. You will usually find Print Screen at the top-right of the keyboard. It might say “Print Screen” or “PrtSc” or some other shortened combination of the letters in the words “Print Screen.” The steps above are great when you need to create a picture file of everything that is visible on your screen. But it’s very possible that you need a screen capture of just the active window or only a part of your screen. Luckily there are some other ways that you can create Windows 10 screenshots, which we will discuss below.
Alternate Windows 10 Screenshot Methods
The section above discusses how you can use the default keyboard shortcut – Windows key + Print Screen – to create an image file in the .png file format. There are some other ways that you can take a screenshot on a Windows 10 Acer computer, and the option that is best for you is going to depend largely on how you intend to use it. You can launch the Snipping Tool by pressing Shift + Windows key + S. This Windows 10 screenshot hotkey is going to open the Snip & Sketch tool. When this tool is open you will see a small rectangular box at the top of the screen that has these options:
Rectangular Snip – This option allows you to draw your own sipping tool window around the items on your screen so that you only capture the parts of the screen you need. Freeform Snip – This option gives you more control over the shape of the snipping tool app if the items you want to capture don’t easily fit within a square or rectangular shape Window Snip – This lets you quickly select the snipping tool window of which you wish to create a screenshot. This is useful if you have a lot of windows open but only need to include one of them in the screenshot image. Fullscreen Snip – This lets you create a full screen snip of everything that is visible on your screen. This works similarly to the standard full screen capture that you would generate if you simply press the Print Screen key on your keyboard.
Speaking of this, you always have the option of using the Print Screen shortcut by pressing the Print Screen button. Much like the other methods that we have discussed in this guide which require you to press Windows and other keyboard combinations, Print Screen will generate an image and save it to your clipboard. One of the elements of using the Snip & Sketch window to generate screenshots is that it doesn’t create the screenshot image file automatically. It simply saves it to your clipboard. You will then need to open another application in addition to the Snip & Sketch app to paste the copied screenshot and save the file.
What to Do After Saving Screenshots to the Clipboard in the Windows Operating System
Once you have become comfortable with taking screenshots after you open screen snipping then you need to paste it into an image editing tool like Adobe Photoshop or Microsoft Paint. Using Paint is probably the most popular way to do this, as it’s included as a default application in almost every recent version of the Microsoft Windows operating system. You can open Paint by searching for it in the search bar at the bottom of the screen on Windows computers and choosing the “Paint” search result, or you can click the Start button and scroll down to it. Once the Paint application is open you can press Ctrl + V to paste the image that the snipping screenshot tool automatically saved to your clipboard. Paint will adjust the size of the canvas to match the size of the free form snip, full screen snip capture, or whichever mode you chose to generate the image of your PC screen. Once you have pasted the image and made any adjustments you can click the File tab at the top-left of the Paint window then choose “Save As” and pick one of the following file types:
Png image file JPEG image file BMP image file GIF image file
More Information on Windows 10 Screenshots and the Snipping Tool
In Windows 10 you may also need to make a screen recording where you create a video of you performing tasks on the computer. While there are some third-party app screen recorders that you can download that offer additional screen record features and options, you have something called the Xbox Game Bar in Windows 10 which also offers this feature. The Xbox Game Bar is accessed by clicking the Start or Windows button at the bottom-left corner of the screen, then scrolling down and selecting the Xbox Game Bar option. You can also use the keyboard shortcut – Windows key + G to launch the application. It appears as an overlay at the top of the screen. If you click the record button it will start creating the video. When you are done, simply click the stop button to end the recording. The saved screen recording can be found in the “Captures” folder inside of the “Videos” folder. While the images that you create either with the Snip Sketch tool or one of the PrtScrn key options are generally small enough for you to email them easily, when you record videos, especially ones that have longer record times, the files can be quite large. You may need to upload the video file to a cloud storage service like Google Drive, Dropbox, or OneDrive, then share a link to the video file from there instead. A Windows 10 printscreen file can be quite large, especially if you have multiple monitors. Windows will capture all of your screens as one image file when you do a standard screenshot, which can be a very high number of pixels depending on your screen resolutions.
You can either choose to press print screen in combination with some other buttons, or you can use the Windows snipping tool. If you open a Chrome tab and go to this link – https://chrome.google.com/webstore/search/screenshot You will see search results for the search term “screenshot.” You can install extensions from that list and try them out to see if there’s anything there you like. You can locate this file by clicking the folder icon in your taskbar, opening the Pictures folder, then selecting Screenshots. The process to open the snipping tool so that you can capture specific areas of the screen instead is to simply press the Windows Key + Shift + S. You can then select one of the options in the snipping tool menu at the top of the screen to capture the screen content you want to save. You can take a picture of something on your screen with your phone camera in this case, or record a video if there is a series of events that you need to show someone during the boot up process. After receiving his Bachelor’s and Master’s degrees in Computer Science he spent several years working in IT management for small businesses. However, he now works full time writing content online and creating websites. His main writing topics include iPhones, Microsoft Office, Google Apps, Android, and Photoshop, but he has also written about many other tech topics as well. Read his full bio here.
You may opt out at any time. Read our Privacy Policy