While Powerpoint is very popular and the popularity of online tools like Google Slides and Powerpoint Online has made those files easier to work with, you may still need a PDF version of some documents. Luckily Powerpoint has a conversion tool within the application that you can use to make a PDF from your Powerpoint file. Our guide below will show you how to perform this conversion and create a PDF copy of your slideshow.
How to Create a PDF Copy of a Microsoft Powerpoint Presentation
Our guide continues below with additional information on how to convert a Powerpoint file to a PDF, including pictures of these steps. A lot of the people you deal with in a professional environment are going to have their own preferences for how they like to get things done. While no one can deny the effectiveness of Powerpoint as a means for directly conveying a point, there are some people that do not use Powerpoint, don’t know how to use it, or simply don’t like it. So if you send someone like this a Powerpoint file with your important ideas or information, they might not read it. Luckily Powerpoint 2010 has an impressive set of tools for creating different types of files from your slide show (you can even turn it into a video), including a PDF.
How to Convert a Powerpoint 2010 Presentation to a PDF File (Guide with Pictures)
A PDF is a great file type when you need to create a document to share. It is also an excellent choice for complex images created in graphic editing programs like Photoshop or Illustrator. But many people will not think of it as a file type that can be used instead of a Powerpoint slideshow, so they wouldn’t even think that creating a PDF of a slideshow was a feasible alternative. But it is actually a great format for sharing a presentation, and Powerpoint 2010 makes it very easy to create one.
Step 1: Double-click your Powerpoint presentation to open it.
Step 2: Click the File tab at the top-left corner of the window.
Step 3: Click Save & Send in the column at the left side of the window.
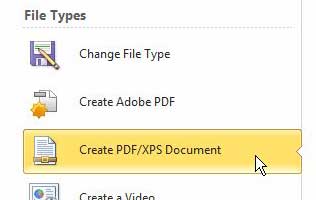
Step 4: Click the Create PDF/XPS Document button in the File Types section at the bottom of the window.
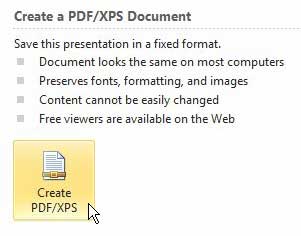
Step 5: Click the Create PDF/XPS button at the top-right corner of the window.
Step 6: Choose a location on your computer to which to save the file, type a name for it into the File Name field at the bottom of the window, then click the Save button.
Now that you know how to convert a Powerpoint presentation to a PDF you will be able to use this technique whenever you need a PDF version of a slideshow that you have made. You will now have a PDF copy of your slideshow in the location that you selected. Since some people may be wondering, this does not affect the original, Powerpoint version of the file. That will still remain in its original state, in the location to which it was originally saved. You now just have a PDF version of the slideshow that you can send to anyone that requires the presentation to be in that format.
Additional Sources
After receiving his Bachelor’s and Master’s degrees in Computer Science he spent several years working in IT management for small businesses. However, he now works full time writing content online and creating websites. His main writing topics include iPhones, Microsoft Office, Google Apps, Android, and Photoshop, but he has also written about many other tech topics as well. Read his full bio here.