But rather than printing the spreadsheet and wasting paper to view the print area, there is another method that you can use to view your print area in Excel 2010. Our short guide below will list the steps necessary to easily tell which part of your spreadsheet will print, as defined by the print area settings.
Show the Print Area in Excel 2010
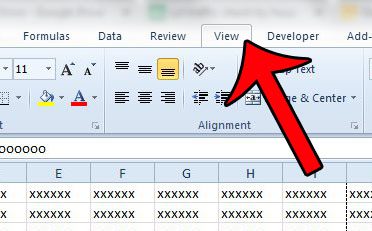
The steps in this article will show you how to view the portion of your spreadsheet that has been designated at the print area. If you do not want to have a print area for your spreadsheet, and would instead prefer to print the entire document, then you can read this article to learn how to clear the print area. Step 1: Open your spreadsheet in Excel 2010. Step 2: Click the View tab at the top of the window.
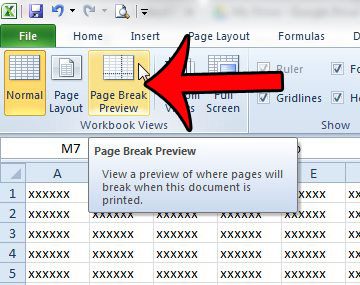
Step 3: Click the Page Break View button in the Workbook Views section of the navigational ribbon.
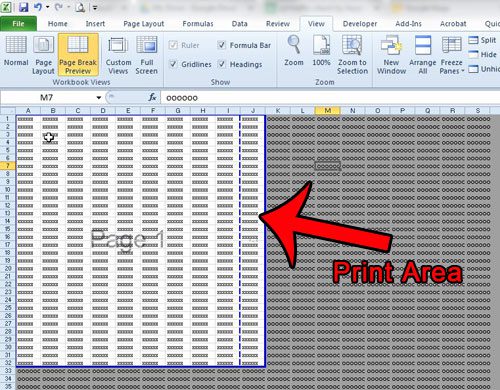
The print area is the part of the spreadsheet in this view that is white, with a page number watermark behind it. The grayed-out part of the spreadsheet is the rest of your worksheet that is not included in the print area.
Are there one or two columns of your spreadsheet that are printing on their own piece of paper? Read here to learn how to force them to print with the rest of the columns in your spreadsheet. After receiving his Bachelor’s and Master’s degrees in Computer Science he spent several years working in IT management for small businesses. However, he now works full time writing content online and creating websites. His main writing topics include iPhones, Microsoft Office, Google Apps, Android, and Photoshop, but he has also written about many other tech topics as well. Read his full bio here.
You may opt out at any time. Read our Privacy Policy


