Luckily our Excel print all columns on one page guide can provide you with some settings that can fix this issue.
How to Print All Spreadsheet Columns on a Single Page in Excel
Our Excel print all columns on one page guide continues below, with additional information and pictures of these steps. It can be very difficult to manage a large, printed-out Excel spreadsheet when you have columns, rows and data that are all spread out across multiple pages. We have previously written about how to print an entire Excel spreadsheet on one page in Excel 2010, and our Excel expand all rows guide has some similar information, but this might not be a practical option for larger spreadsheets, as it will make the text very small. However, you can modify the printout of an Excel 2013 spreadsheet to only print all of your columns on one page, allowing documents with a large number of rows to be printed on multiple pages, just without any stray columns showing up on their own pages. So continue reading below to learn how print all of your columns on one page in Excel 2013. Have you been thinking about upgrading to Windows 8, or installing Office 2013 on some more computers? Learn more about Windows 8 and Office 2013 subscriptions to see if they offer everything that you might need.
How to Fit all Spreadsheet Columns on One Page in Excel 2013 (Guide with Pictures)
This option is best left for situations where your spreadsheet might otherwise print some extra pages with only a handful of columns on them. There is only a finite amount of space on a page, and the Excel print utility is going to reduce the size of the columns to force them all into that space. So while you may be tempted to force a 90-column spreadsheet to one page, the results may not be very useful. But you can experiment with the steps below to see how your document will look when you print all of the columns on one page, then you can check in Print Preview to see if you are happy with the result.
Step 1: Open your spreadsheet in Excel 2013.
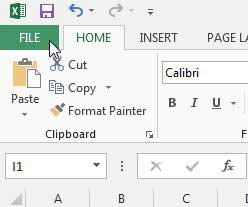
Step 2: Click the File tab at the top-left corner of the window.
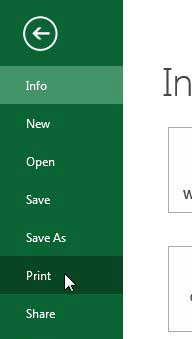
Step 3: Click the Print option in the column at the left side of the window.
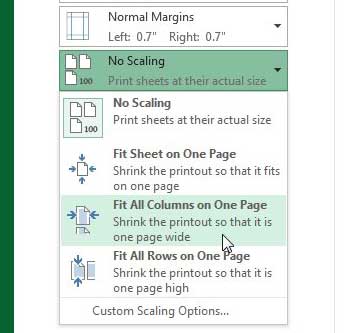
Step 4: Click the No Scaling option at the bottom of the window, then click the Fit All Columns on One Page option.
Check the Print Preview panel at the right side of the window to see if you are happy with the result. This option may not work for a lot of spreadsheets, but can come in handy when you just need to conserve a small amount of space. Now that you have gone through our Excel print all columns on one page guide you should be able to ease your printing woes pretty significantly for future spreadsheets. If you’ve always seen the PivotTable option in Excel 2013 and wondered if it was useful, read this article on Excel 2013 PivotTables. They can come in very handy when you need to summarize a large amount of data.
Additional Sources
After receiving his Bachelor’s and Master’s degrees in Computer Science he spent several years working in IT management for small businesses. However, he now works full time writing content online and creating websites. His main writing topics include iPhones, Microsoft Office, Google Apps, Android, and Photoshop, but he has also written about many other tech topics as well. Read his full bio here.
You may opt out at any time. Read our Privacy Policy